Apache Ant with Selenium : 전체 자습서
Apache Ant는 무엇입니까?
완전한 소프트웨어 제품을 만드는 동안 다른 제 3 자 API, 클래스 경로, 이전 실행 바이너리 파일 정리, 소스 코드 컴파일, 소스 코드 실행, 보고서 작성 및 배포 코드 기반 등을 고려해야합니다. 이러한 작업이 완료되면 수동으로 하나씩 수행하면 막대한 시간이 걸리며 프로세스가 오류가 발생하기 쉽습니다.
Ant와 같은 빌드 도구가 중요합니다. Ant의 설정 파일 (일반적으로 build.xml)에 언급 된 순차적 순서로 모든 프로세스를 저장, 실행 및 자동화합니다.

Ant 빌드의 이점
1. Ant는 정리, 컴파일, 종속성 설정, 실행,보고 등의 응용 프로그램 수명주기를 만듭니다.
2. 타사 API 종속성은 Ant에 의해 설정 될 수 있습니다. 즉, 다른 Jar 파일의 클래스 경로는 Ant 빌드 파일에 의해 설정됩니다.
3. 종단 간 배달 및 배포를위한 완벽한 응용 프로그램이 만들어집니다.
4. XML 파일을 사용하여 모든 구성을 수행 할 수 있으며 명령 줄에서 실행할 수있는 간단한 빌드 도구입니다.
5. 구성이 실제 응용 프로그램 논리와 별개이므로 코드를 깨끗하게 만듭니다.
Ant 설치 방법
Windows에서 Ant를 설치하는 단계는 다음과 같습니다
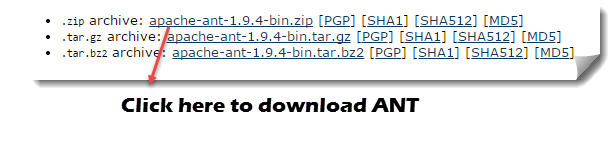
1 단계) http://ant.apache.org/bindownload.cgi로 이동합니다. apache-ant-1.9.4-bin.zip 에서 .zip 파일을 다운로드하십시오.
2 단계) 폴더의 압축을 풀고 압축 해제 된 폴더의 루트로 경로를 복사합니다.

3 단계) 시작 -> 컴퓨터 ->( Start -> Computer ->) 여기를 마우스 오른쪽 버튼으로 클릭하고 '등록 정보(Properties)'를 선택한 다음 고급 시스템 설정(Advanced System Settings)을 클릭하십시오.

4 단계) 새 창이 열립니다. '환경 변수 ...( Environment Variable)'버튼을 클릭하십시오.

5) 'New ...'버튼을 클릭하고 변수 이름을 'ANT_HOME', 변수 값을 압축 해제 폴더의 루트 경로로 설정하고 OK를 클릭합니다.

6 단계) 이제 목록에서 ' Path'변수를 선택하고 ' Edit'을 클릭하고 추가하십시오. % ANT_HOME % \ bin.

시스템을 한 번 재시작하면 이제 Ant 빌드 도구를 사용할 준비가되었습니다.
7 단계) 명령 행을 사용하여 Ant의 버전을 확인하려면 :
Ant –version

Build.xml 이해하기
Build.xml은 Ant 빌드 도구에서 가장 중요한 구성 요소입니다. A의 자바 프로젝트, 모든 청소, 설정, 편집 및 배포와 관련된 작업은 XML 형식으로이 파일에 언급되어있다. 명령 행이나 IDE 플러그인을 사용하여이 XML 파일을 실행하면이 파일에 기록 된 모든 지시 사항이 순차적으로 실행됩니다.
샘플 빌드 내의 코드를 이해해 보겠습니다 .XML
- 프로젝트 태그는 프로젝트 이름과 basedir 속성을 언급하는 데 사용됩니다. basedir은 응용 프로그램의 루트 디렉토리입니다.
<project name = "YTMonetize"basedir = ".">
- 속성 태그는 추가 단계에서 사용될 build.XML 파일의 변수로 사용됩니다.
<property name = "build.dir"value = "$ {basedir} / build"/>
<property name = "external.jars"value = ". \ resources"/>
<property name = "ytoperation.dir"value = "$ {external.jars} / YTOperation"/>
<property name = "src.dir"value = "$ {basedir} / src"/>
- 순차적으로 실행되는 단계로 사용되는 대상 태그. Name 속성은 대상의 이름입니다. 단일 build.xml에 여러 대상을 가질 수 있습니다.
<target name = "setClassPath">
- 경로 태그는 공용 위치에있는 모든 파일을 논리적으로 묶는 데 사용됩니다
<path id = "classpath_jars">
- pathelement 태그는 모든 파일이 저장된 공통 위치의 루트로 경로를 설정합니다
<pathelement 경로 = "$ {basedir} /"/>
- 경로 태그 내의 모든 공통 파일의 경로를 시스템의 클래스 경로 형식으로 변환하는 데 사용되는 pathconvert 태그
<pathconvert pathsep = ";" property = "test.classpath"refid = "classpath_jars"/>
- 우리의 프로젝트에서 다른 third party jar를위한 classpath를 설정하는데 사용되는 fileset 태그
<fileset dir="${ytoperation.dir}" includes="*.jar"/>
- 에코 태그는 콘솔에 텍스트를 인쇄하는 데 사용됩니다.
<echo message="deleting existing build directory"/>
- 태그를 삭제하면 지정된 폴더의 데이터가 정리됩니다.
<delete dir = "$ {build.dir}"/>
- mkdir 태그가 새로운 디렉토리를 생성합니다.
<mkdir dir = "$ {build.dir}"/>
- java 소스 코드를 컴파일하고 .class 파일을 새 폴더로 이동하는 데 사용되는 javac 태그
<javac destdir = "$ {build.dir}"srcdir = "$ {src.dir}">
<classpath refid = "classpath_jars"/>
</ javac>
- jar 태그는 .class 파일로부터 jar 파일을 생성합니다.
<jar destfile = "$ {ytoperation.dir} /YTOperation.jar"basedir = "$ {build.dir}">
- manifest 태그는 실행을 위해 기본 클래스를 설정합니다.
<manifest>
<attribute name = "Main-Class"value = "test.Main"/>
</ manifest>
- 하나의 대상을 다른 대상에 종속시키는 데 사용되는 'depends'특성
<target name = "run"depends = "compile">
- 자바 태그는 컴파일 대상 섹션에서 생성 된 jar에서 main 함수를 실행합니다.
<java jar = "$ {ytoperation.dir} /YTOperation.jar"fork = "true"/>
이클립스 플러그인을 사용하여 Ant 실행
Eclipse에서 Ant를 실행하려면 build.xml 파일로 이동 -> 파일을 마우스 오른쪽 단추로 클릭 -> 다른 이름으로 실행 ... -> 파일 작성을 클릭하십시오.

예:
우리는 Ant 기능을 아주 분명하게 설명 할 작은 샘플 프로그램을 가져갈 것입니다. 우리의 프로젝트 구조는 다음과 같습니다 -

여기이 예제에서는 4 개의 타겟이 있습니다.
1. 외부 jar의 클래스 경로 설정,
2. 이전에 준수한 코드 정리
3. 기존 Java 코드 컴파일
4. 코드 실행
Guru99AntClass.class
package testAnt; import java.util.Date; public class Guru99AntClass { public static void main(String...s){ System.out.println("HELLO GURU99 ANT PROGRAM"); System.out.println("TODAY's DATE IS->"+ currentDate() ); } public static String currentDate(){ return new Date().toString(); } }
Build.xml
<?xml version="1.0" encoding="UTF-8" standalone="no"?> <!--Project tag used to mention the project name, and basedir attribute will be the root directory of the application--> <project name="YTMonetize" basedir="."> <!--Property tags will be used as variables in build.xml file to use in further steps--> <property name="build.dir" value="${basedir}/build"/> <property name="external.jars" value=".\resources"/> <property name="ytoperation.dir" value="${external.jars}/YTOperation"/><property name="src.dir"value="${basedir}/src"/><!--Target tags used as steps that will execute in sequential order. name attribute will be the name of the target and < a name=OLE_LINK1 >'depends' attribute used to make one target to depend on another target --> <target name="setClassPath"> <path id="classpath_jars"> <pathelement path="${basedir}/"/> </path> <pathconvert pathsep=";"property="test.classpath" refid="classpath_jars"/> </target> <target name="clean"> <!--echo tag will use to print text on console--> <echo message="deleting existing build directory"/> <!--delete tag will clean data from given folder--> <delete dir="${build.dir}"/> </target> <target name="compile" depends="clean,setClassPath"> <echo message="classpath:${test.classpath}"/> <echo message="compiling.........."/> <!--mkdir tag will create new director--> <mkdir dir="${build.dir}"/> <echo message="classpath:${test.classpath}"/> <echo message="compiling.........."/> <!--javac tag used to compile java source code and move .class files to a new folder--> <javac destdir="${build.dir}" srcdir="${src.dir}"> <classpath refid="classpath_jars"/> </javac> <!--jar tag will create jar file from .class files--> <jar destfile="${ytoperation.dir}/YTOperation.jar"basedir="${build.dir}"> <!--manifest tag will set your main class for execution--> <manifest> <attribute name="Main-Class" value="testAnt.Guru99AntClass"/> </manifest> </jar> </target> <target name="run" depends="compile"> <!--java tag will execute main function from the jar created in compile target section--> <java jar="${ytoperation.dir}/YTOperation.jar"fork="true"/> </target> </project>
Ant를 사용하여 TestNG 코드를 실행하는 방법
여기서는 Testng 메소드 로 클래스를 만들고 build.xml에서 Testing 을 위한 클래스 경로를 설정 합니다.
이제 testng 메서드를 실행하기 위해 또 다른 testng.xml 파일을 만들고이 파일을 build.xml 파일에서 호출합니다.
1 단계) 우리는 생성 " Guru99AntClass.class" 패키지 testAnt
Guru99AntClass.class
package testAnt;import java.util.Date;import org.testng.annotations.Test; public class Guru99AntClass { @Test public void Guru99AntTestNGMethod(){ System.out.println("HELLO GURU99 ANT PROGRAM"); System.out.println("TODAY's DATE IS->"+ currentDate() ); } public static String currentDate(){ return new Date().toString(); } }
2 단계) Build.xml에이 클래스를로드 할 대상 만들기
<!-- Load testNG and add to the class path of application --> <target name="loadTestNG" depends="setClassPath"><!—using taskdef tag we can add a task to run on the current project. In below line, we are adding testing task in this project. Using testing task here now we can run testing code using the ant script --> <taskdef resource="testngtasks" classpath="${test.classpath}"/></target>
3 단계) testng.xml 생성
testng.xml
<?xml version="1.0"encoding="UTF-8"?><!DOCTYPE suite SYSTEM "http://testng.org/testng-1.0.dtd"><suite name="YT"thread-count="1"> <test name="GURU99TestNGAnt"> <classes> <class name="testAnt.Guru99AntClass"> </class></classes></test></suite>
</ suite>
4 단계) 이 TestNG 코드를 실행하려면 Build.xml에 대상을 만듭니다.
<target name="runGuru99TestNGAnt" depends="compile"><!-- testng tag will be used to execute testng code using corresponding testng.xml file. Here classpath attribute is setting classpath for testng's jar to the project--> <testng classpath="${test.classpath};${build.dir}"><!—xmlfileset tag is used here to run testng's code using testing.xml file. Using includes tag we are mentioning path to testing.xml file--> <xmlfileset dir="${basedir}" includes="testng.xml"/></testng>
5 단계) 전체 Build.xml
<?xml version="1.0"encoding="UTF-8"standalone="no"?><!--Project tag used to mention the project name, and basedir attribute will be the root directory of the application--> <project name="YTMonetize" basedir="."> <!--Property tags will be used as variables in build.xml file to use in further steps--> <property name="build.dir"value="${basedir}/build"/><!-- put testng related jar in the resource folder --> <property name="external.jars" value=".\resource"/> <property name="src.dir" value="${basedir}/src"/><!--Target tags used as steps that will execute in sequential order. name attribute will be the name of the target and 'depends' attribute used to make one target to depend on another target--><!-- Load testNG and add to the class path of application --> <target name="loadTestNG"depends="setClassPath"> <taskdef resource="testngtasks"classpath="${test.classpath}"/> </target> <target name="setClassPath"> <path id="classpath_jars"> <pathelement path="${basedir}/"/> <fileset dir="${external.jars}" includes="*.jar"/> </path> <pathconvert pathsep=";"property="test.classpath"refid="classpath_jars"/> </target> <target name="clean"> <!--echo tag will use to print text on console--> <echo message="deleting existing build directory"/> <!--delete tag will clean data from given folder--> <delete dir="${build.dir}"/> </target><target name="compile"depends="clean,setClassPath,loadTestNG"> <echo message="classpath:${test.classpath}"/> <echo message="compiling.........."/> <!--mkdir tag will create new director--> <mkdir dir="${build.dir}"/> <echo message="classpath:${test.classpath}"/> <echo message="compiling.........."/> <!--javac tag used to compile java source code and move .class files to a new folder--> <javac destdir="${build.dir}"srcdir="${src.dir}"> <classpath refid="classpath_jars"/> </javac> </target><target name="runGuru99TestNGAnt"depends="compile"> <!-- testng tag will be used to execute testng code using corresponding testng.xml file --> <testng classpath="${test.classpath};${build.dir}"> <xmlfileset dir="${basedir}"includes="testng.xml"/> </testng></target></project>
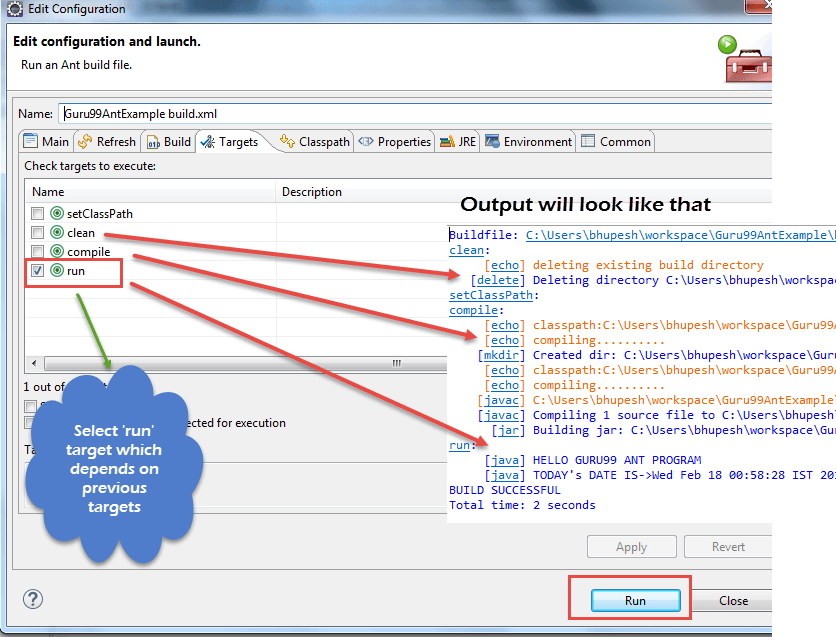
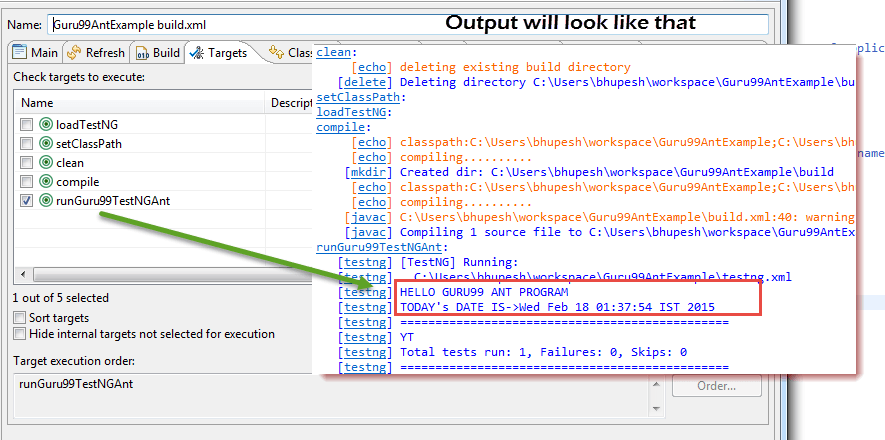
6 단계) 출력
 Guru99AntExample.zip
Ant와 Selenium Webdriver :
지금까지 우리는 ANT를 사용하여 모든 타사 항아리를 시스템의 특정 위치에 놓고 프로젝트의 경로를 설정할 수 있다는 것을 배웠습니다. 이 방법을 사용하여 프로젝트의 모든 종속성을 한 곳에서 설정하고 컴파일, 실행 및 배포시 더욱 신뢰할 수있게 만듭니다.
마찬가지로 셀레늄을 사용하는 테스트 프로젝트의 경우 build.xml에서 셀렌 의존성을 쉽게 언급 할 수 있으며 애플리케이션의 클래스 경로를 수동으로 추가 할 필요가 없습니다.
이제 프로젝트에 대한 클래스 패스를 설정하는 아래에 언급 된 기존의 방법을 무시할 수 있습니다.

예:
이전 예제를 수정하려고합니다.
1 단계) 자원 폴더에서 selenium.jars 속성을 selenium 관련 jar로 설정합니다.
<property name = "selenium.jars"value = ". \ selenium"/>
2 단계) 대상 setClassPath에서 셀레늄 파일을 추가합니다.
<target name="setClassPath"> <path id="classpath_jars"> <pathelement path="${basedir}/"/> <fileset dir="${external.jars}" includes="*.jar"/> <!-- selenium jar added here --> <fileset dir="${selenium.jars}" includes="*.jar"/> </path>
3 단계) Build.xml 완료 :
<? xml version = "1.0"encoding = "UTF-8"standalone = "no"?>
<?xml version="1.0" encoding="UTF-8" standalone="no"?> <!--Project tag used to mention the project name, and basedir attribute will be the root directory of the application--> <project name="YTMonetize" basedir="."> <!--Property tags will be used as variables in build.xml file to use in further steps--> <property name="build.dir" value="${basedir}/build"/> <!-- put testng related jar in the resource folder --> <property name="external.jars" value=".\resource"/><!-- put selenium related jar in resource folder --> <property name="selenium.jars" value=".\selenium"/> <property name="src.dir" value="${basedir}/src"/> <!--Target tags used as steps that will execute in sequential order. name attribute will be the name of the target and 'depends' attribute used to make one target to depend on another target--> <!-- Load testNG and add to the class path of application --> <target name="loadTestNG" depends="setClassPath"> <taskdef resource="testngtasks" classpath="${test.classpath}"/> </target><target name="setClassPath"> <path id="classpath_jars"> <pathelement path="${basedir}/"/> <fileset dir="${external.jars}" includes="*.jar"/> <!-- selenium jar added here --> <fileset dir="${selenium.jars}"includes="*.jar"/> </path> <pathconvert pathsep=";" property="test.classpath" refid="classpath_jars"/></target><target name="clean"><!--echo tag will use to print text on console--> <echo message="deleting existing build directory"/> <!--delete tag will clean data from given folder--> <delete dir="${build.dir}"/> </target><target name="compile" depends="clean,setClassPath,loadTestNG"> <echo message="classpath:${test.classpath}"/> <echo message="compiling.........."/> <!--mkdir tag will create new director--> <mkdir dir="${build.dir}"/> <echo message="classpath:${test.classpath}"/> <echo message="compiling.........."/> <!--javac tag used to compile java source code and move .class files to new folder--> <javac destdir="${build.dir}"srcdir="${src.dir}"> <classpath refid="classpath_jars"/> </javac></target><target name="runGuru99TestNGAnt" depends="compile"> <!-- testng tag will be used to execute testng code using corresponding testng.xml file --> <testng classpath="${test.classpath};${build.dir}"> <xmlfileset dir="${basedir}" includes="testng.xml"/> </testng> </target></project>
4 단계) 이전에 생성 된 클래스 Guru99AntClass.java를 새 코드로 변경하십시오.
이 예제에서 Selenium을 사용하는 단계는 다음과 같습니다.
1. http://demo.guru99.com/test/guru99home/으로 이동 하십시오.
2. 모든 강좌 링크를 하나씩 읽으십시오.
3. 콘솔의 모든 코스 하이퍼 링크를 인쇄하십시오.
Guru99AntClass.java :
package testAnt; import java.util.List; import org.openqa.selenium.By;import org.openqa.selenium.WebDriver;import org.openqa.selenium.WebElement; import org.openqa.selenium.firefox.FirefoxDriver;import org.testng.annotations.Test; public class Guru99AntClass { @Test public void Guru99AntTestNGMethod(){ WebDriver driver = new FirefoxDriver(); driver.get("http://demo.guru99.com/test/guru99home/"); List<WebElement> listAllCourseLinks = driver.findElements(By.xpath("//div[@class='canvas-middle']//a")); for(WebElement webElement : listAllCourseLinks) { System.out.println(webElement.getAttribute("href")); } }}
5) 성공적인 실행 결과는 다음과 같습니다.

개요:
Ant는 Java 용 빌드 도구입니다.
코드 컴파일, 배포, 실행 프로세스에 사용되는 Ant입니다.
Ant는 Apache 웹 사이트 에서 다운로드 할 수 있습니다 .
Ant를 사용하여 실행 목표를 구성하는 데 사용되는 Build.xml 파일.
Ant는 명령 행 또는 eclipse와 같은 적합한 IDE 플러그인에서 실행할 수 있습니다.
'자동화테스트 > Selenium' 카테고리의 다른 글
| Selenium WebDriver의 쿠키 처리 (0) | 2019.01.04 |
|---|---|
| GitHub에 셀렌 스크립트 업로드 (0) | 2019.01.03 |
| Selenium Core Extensions (사용자 확장 프로그램 js) (0) | 2019.01.01 |
| Selenium Webdriver를 사용하여 모든 / 깨진 링크를 찾는 방법 (0) | 2018.12.31 |
| Selenium을 이용한 플래시 테스팅 (0) | 2018.12.30 |
